
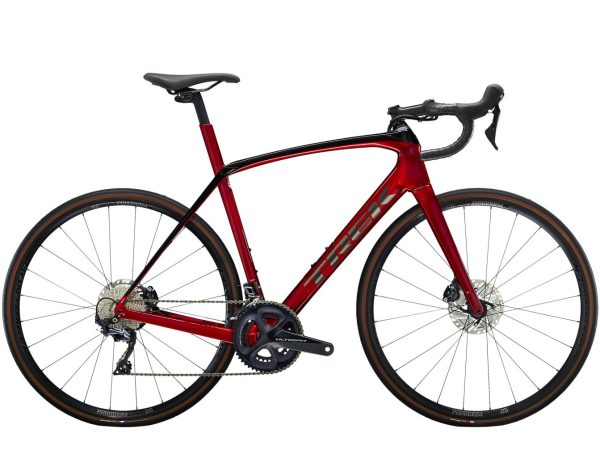
TREK FX 2 Disc Hybrid Bike Review
Trek FX 2 Disc is a sleek and functional hybrid bike with disc brakes that allow you to stop quickly and ask for change even in inclement weather. With the lightweight aluminium frame, 18 speeds, and semi-skinny tyres that are quick on the road and stable on uneven terrain, you can commute, train, or just ride for enjoyment.
Overview


| Category | Bikes |
| Brand | Specialized |
| Model | FX 2 Disc |
| Type | Hybrid Bike |
| Year | 2022 |
Features of Trek FX 1 Hybrid Bike
Alpha Aluminium Frame
Alpha aluminium frame which is quite lightweight, makes up the frame of the Trek FX 2 Disc, making it very easy to handle. In addition to being lightweight, the frame offers mounts for racks, fenders, or mudguards, which improves the bike’s durability and performance. Bike riders can remotely track their rides using a computer or phone and a DuoTrap S compatible accessory that is attached to the aluminium frame.
DuoTrap S Compatibility and Blendr Stem
The Trek FX 2 disc comes with the excellent Duotrap S, which connects to your phone and tracks your fitness. It is also compatible with all ANT + wireless players, Garmin, and PowerTap.
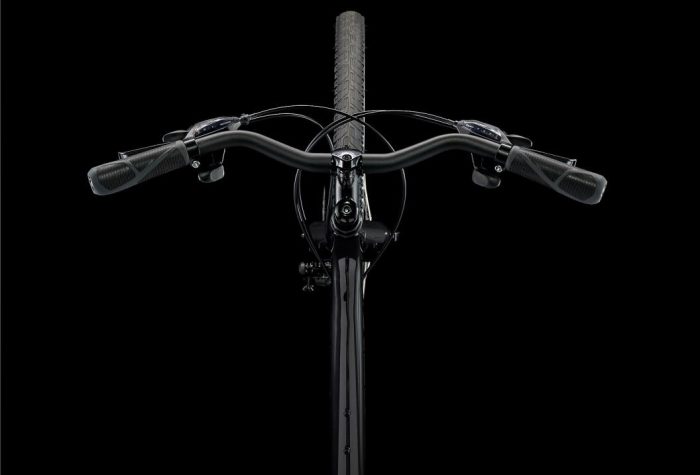
A Bontrager stem technology, which enables riders to attach their equipment to the stem to provide tremendous user friendliness, is another element of the Trek FX2.
Other Features
During rides, ergonomic grips will increase efficiency while keeping the rider comfortable.
In order to balance strength and save weight, the alpha gold aluminium is sculpted into tube shapes.
You may add racks and mudguards to the Rack and Mudguard quite easily because they have built-in mounts. Your bike’s adaptability is increased by the additional mudguards and racks.
Oh! What a feeling
Better braking assurance means that inclement weather won’t have to prohibit you from enjoying your ride.
It is adaptable and may be used for anything, including commuting, grocery shopping at the farmer’s market, or cycling for exercise.
When you add DuoTrap S to FX, you can connect it to your smartphone and send your trip data to your preferred fitness app.
Internal cable routing shields the cables from the weather and enhances the bike’s clean appearance.
It has a lifetime guarantee and is supported by a large network of retail partners, much like any Trek hybrid.
Specifications
Check specifications here
| Components | Details |
| Frame | Alpha Gold Aluminum, DuoTrap S compatible, internal cable routing, flat mount disc, rack & fender mounts, 135x5mm QR |
| Fork | FX Alloy, flat mount disc, rack mounts, 405mm axle-to-crown, ThruSkew 5mm QR |
| Hub front | Formula DC-20, alloy, 6-bolt, 5x100mm QR |
| Hub rear | Formula DC-22, alloy, 6-bolt, Shimano 8/9/10 freehub, 135x5mm QR |
| Rim | Bontrager Connection, alloy, double-wall, 32-hole, schrader valve |
| Tire | Bontrager H2 Comp, wire bead, 30tpi, 700x35c |
| Max tire size | 38c without fenders, 35c with fenders |
| Shifter: Size: XS, S, M, L, XL, XXL | Shimano Altus M2010, 9 speed |
| Shifter: Size: XS, S, M, L, XL, XXL | Shimano Altus M2010, 2 speed |
| Front derailleur | Shimano Acera T3000, 34.9mm clamp, top swing, dual pull |
| Rear derailleur | Shimano Altus M2000, long cage |
| Crank | Forged alloy, 46/30, chainguard, 170mm length |
| Bottom bracket | Sealed cartridge, 68mm |
| Cassette | Shimano HG200, 11-36, 9 speed |
| Chain | KMC X9 |
| Pedal | Bontrager City pedals |
| Max chainring size | 1x: 42T, 2x/3x: 48T |
| Saddle | Bontrager Sport |
| Seatpost | Bontrager alloy, 27.2mm, 12mm offset, 330mm length |
| Handlebar:Size: XS, S, M | Bontrager alloy, 31.8mm, 15mm rise, 600mm width |
| Handlebar:Size: L, XL, XXL | Bontrager alloy, 31.8mm, 15mm rise, 660mm width |
| Grips | Bontrager Satellite |
| Stem: Size: XS, S, M | Bontrager alloy, 31.8mm, Blendr compatible, 7 degree, 90mm length |
| Stem: Size: L, XL, XXL | Bontrager alloy, 31.8mm, Blendr compatible, 7 degree, 100mm length |
| Headset | 1-1/8” threadless, sealed cartridge bearings |
| Brake | Tektro HD-R280 hydraulic disc, flat mount, 160mm rotor |
| Rotor size | Max brake rotor size: 160mm |
| Weight | M – 11.73 kg / 25.87 lbs |
| Weight limit | This bike has a maximum total weight limit (combined weight of bicycle, rider, and cargo) of 300 pounds (136 kg). |
You want a high-end hybrid bike with excellent components that will last over time, a lightweight frame, and disc brakes for greater all-weather stopping capability.
Strong disc brakes, a Shimano transmission with 18 speeds and a wide range of gearing so you’re never pedalling too hard or too gentle, a lightweight aluminium frame with hydraulic disc brakes for all-weather stopping capability, and mounts that make it simple to decorate your ride!
The Trek FX’s hydraulic disc brake and Shimano shifters and derailleurs enable it to go quickly and maneuverably. Bontrager alloy that has been reinforced in the saddle and seatpost area further supports it.
Pros & Cons of Trek FX 2 Disc Hybrid Bike
Pros
Superb component quality, good handling, and willing ride
Internally fitted cables being safeguarded
Lightweight Alpha Almunium Frame
Versatile bike
The bike is reasonably priced.
Mudguard mounts are concealed in the frame.
Cons
Seat is not comfortable in long rides
Frequently Asked Questions – FAQs of Trek FX 2 Disc Hybrid Bike:
Is Trek FX2 a womens bike?
A flexible hybrid bike for training, commuting, or just having fun, the FX 2 Disc Women’s is available. It is designed with a lightweight frame, dependable disc brakes that work in all weather, a variety of gears, and touchpoints that can offer a better fit and feel for women right away.
Is Trek FX good?
One of Trek’s best-selling lines, the FX series is a bike you’ll use for many years to come. Shimano’s dependable shifter and derailleurs provide a smooth, quick, and reliable ride on a light, agile frame.
Is the Trek FX a gravel bike?
Trek recently updated their FX Sport Carbon line to let riders to travel off-road and over gravel. With beefier tyres and more clearance, flat bars for control, and a larger head tube for a somewhat more upright ride, the new design focuses on hybrid urban/rural capability.
What kind of bike is the trek FX2?
A hybrid fitness bike is the Trek FX 2. Any bicycle that isn’t classified as a road bike, mountain bike, or cruiser is considered a hybrid. Fitness hybrids are bikes with handlebars that are flat rather than the drop bars often found on endurance road bikes.
What is the difference between Trek FX bikes?
Although the FX has several road bike-like features, it also boasts a comfortable flat handle bar that maintains a more upright riding position than conventional drop bars. It is ideal for commuting and fitness rides because it is incredibly light and has tyres that are narrower for roads.
Conclusion | TREK FX 2 Disc Hybrid Bike Review
4.7
Total score
Our Rating
The FX 2 Disc is a hybrid bike with components that work well for errand runs, training rides, and morning commutes. Although there are countless accessory possibilities, the disc brakes, which offer excellent stopping capability in all weather situations, are what really distinguish this model.
Trek FX 2 Disc was created with speed and efficiency in mind. With a derailleur from Shimano that has an 8-speed shifter, the bike may be easily transitioned from 0 to 8 in the shortest amount of time. A headset that fits exactly right and a Schrader valve rim are also included. Riders are guaranteed a debris-free chainset even in muddy and forested terrain with a crankset made of forged alloy and a chainguard.
On wheels, the Trek FX2 disc is amazing.


Contact Us
If you have any suggestions or advise, please feel free to reach us via our Contact Us here.
2022 Tour de France: How Time Has Evolved The Tour
2022 Tour de France: List of Participating Teams
Understanding the 2022 Tour de France: A Comprehensive Guide
2022 Mountain Bike | Trek 820 | Review
Buying A New Bicycle? There Are 11 Things You Should Consider
2022 Tour de France: Jerseys And Their Meanings
Tour de France: All Winners Since Beginning 1903
Tour de France: Interesting Historical Facts
What You Need To Know About Tour de France
The Origins Of The Tour de France
Tour de France: FAQs
The Tour de France has confirmed a Netflix series and eight teams that will compete
TREK FX 1 Hybrid Bike Review
The FX 1 hybrid bike performs everywhere you want to ride thanks to its superb components and lightweight aluminium frame. It’s ideal for anyone wishing to commute to work on a multipurpose bike that is covered by a lifetime guarantee, get more fitness, or ride as a family.
Overview


| Category | Bikes |
| Brand | Specialized |
| Model | FX 1 |
| Type | Hybrid Bike |
| Year | 2022 |
Features of Trek FX 1 Hybrid Bike
Alpha Gold Aluminium Frame
The bike handles so smoothly and confidently thanks to its lightweight Alpha Gold Aluminum frame and 21-speed shifting system without any chance of damage of any kind. Strong wheels with double-walled rims that are integrated into the end of the frame give the bike its manoeuvrability. Its installation also makes it possible to quickly add accessories to one’s bicycle, such as fenders, racks, fitness trackers, lighting, a kickstand, etc.
Speed, comfort, and durability are all features of the FX Alpha Gold’s lightweight aluminium frame. A high tensile steel front fork with lowrider mounting is also included with the frame package. Sizes for the frame are 15, 17, 5, 20, and 22.5 inches.
Riders between the heights of 4 feet 10 inches and 6 feet 7 inches can wear these sizes.
High Tensile Steel Fork
The front fork blades on this bike appear to be aluminium just by looking at it, but they are actually steel. They do utilise both a ThruSkew that threads in and out and a flat mount disc connector. Aside from giving the bike’s end a bit more support, this will also make it much simpler to put the wheels on and take them off.
Bontrager Tyres H2 700 X 35C
No matter the weather, you can roll over various surfaces with sufficient control thanks to the smooth Bontrager H2 700 X 35c tyres. The tyre is nearly puncture-free thanks to its excellent traction, efficiency, and threading.
7-speed Shimano Altus EF500
Shimano’s high-performance components are used throughout the Trek FX 1, and the shifter is no exception. The 7-speed Shimano Altus EF500 shifter is silent, dependable, and easy to use.
The shifter will make hills disappear and inclines manageable for road riding. One of the factors for the FX 1’s appeal is this type of Shimano shifter.
DuoTrap S Compatibility
You might want to monitor your fitness development throughout each ride on a fitness bike. The DuoTrap S system on the Trek FX I Hybrid bike incorporates a Bluetooth/ANT+ sensor inside the frame. No, logging journeys on your smartphone or bicycle computer or tracking your fitness advancement do not require an external sensor. Additionally, it is unimportant if you are using a Bontrager, Garmin, PowerTap, or SRM ANT+ wireless player; it will still function.
Oh! What a feeling
It has a lifetime guarantee and is supported by a large network of retail partners, much like any Trek hybrid.
When you add DuoTrap S to FX, you can connect it to your smartphone and send your trip data to your prefered fitness app.
It is adaptable and may be used for anything, including commuting, grocery shopping at the farmer’s market, or cycling for exercise.
Racks, a kickstand, fenders, lights, and other accessories are simple to add!
With this bike, you can spend time outside, get away from screens, and connect with your family.
Specifications
Check specifications here
| Component | Details |
| Frame | Alpha Gold Aluminum, rack & fender mounts, DuoTrap S compatible, cantilever brake mount, 135x5mm QR |
| Fork | FX Steel, threadless steel steerer, rack mounts, cantilever brake mount, 405mm axle-to-crown, 5x100mm QR |
| Hub front | Formula FM21 alloy, 100x5mm QR |
| Skewer front | Formula QR22 |
| Hub rear | Formula FM31 alloy, 135x5mm QR |
| Rim | Bontrager Connection, alloy, double-wall, 32-hole, schrader valve |
| Tire | Bontrager H2 Comp, wire bead, 30tpi, 700x35c |
| Max tire size | 38c without fenders, 35c with fenders |
| Shifter | Shimano Altus EF500, 7 speed |
| Front derailleur | Shimano Tourney TY510, 34.9mm clamp, top swing, dual pull |
| Rear derailleur | Shimano Altus M310 |
| Crank | Forged alloy, 48/38/28, chainguard, 170mm length |
| Bottom bracket | Sealed cartridge, 68mm |
| Cassette | SunRace MFM300 freewheel, 14-34, 7 speed |
| Chain | KMC Z7 |
| Pedal | Wellgo nylon platform |
| Saddle | Bontrager Sport |
| Seatpost | Bontrager alloy, 27.2mm, 12mm offset, 330mm length |
| Handlebar: Size: S, M, L | Bontrager Riser, steel, 25.4mm, 30mm rise, 600mm width |
| Handlebar: Size: XL | Bontrager Riser, steel, 25.4mm, 30mm rise, 620mm width |
| Grips | Bontrager Satellite |
| *Stem | Size: S, M |
| Stem: Size: S, M | Bontrager alloy, 25.4mm clamp, 10 degree, 90mm length |
| Stem: Size: L, XL | Bontrager alloy, 25.4mm clamp, 10 degree, 110mm length |
| Headset | 1-1/8” threadless, sealed cartridge bearings |
| Brake | Tektro alloy linear-pull |
| Weight | M – 12.57 kg / 27.72 lbs |
| Weight limit | This bike has a maximum total weight limit (combined weight of bicycle, rider, and cargo) of 300 pounds (136 kg). |
You want to ride more and are searching for performance where it really matters: a light frame, a variety of gears, and sturdy wheels. In addition, you desire a superb value and the assurance of Trek’s lifetime warranty.
Being a hybrid bike, you can be guaranteed to obtain the best features from all different types of motorcycles in this stunning piece of equipment. The Trek FX I Hybrid Bike is a flexible bike that will serve you well whether you just want to go for a leisurely ride, burn some calories, or simply travel to your destination. Additionally, this bike comes with some excellent specifications and a lifetime warranty. It merely demonstrates how much importance and faith the brand has placed in the rider and the bike’s design.
Pros & Cons of Trek FX 1 Hybrid Bike
Pros
Frame made this bike very light weight
High tensile steel fork
Can carry up to 300 pound of weight
Frame has rack mount holes for fenders or cages
Fast bike and easy to handle due to Shimano 7-speed shifter
Cons
Poor off-road handling
Seat is not comfortable in long rides
Frequently Asked Questions – FAQs of Trek FX 1 Hybrid Bike:
Is the Trek FX a gravel bike?
Trek recently updated their FX Sport Carbon line to let riders to travel off-road and over gravel. With beefier tyres and more clearance, flat bars for control, and a larger head tube for a somewhat more upright ride, the new design focuses on hybrid urban/rural capability.
Is Trek FX 1 fast?
One of Trek’s best-selling lines, the FX series is a bike you’ll use for many years to come. Shimano’s dependable shifter and derailleurs provide a smooth, quick, and reliable ride on a light, agile frame.
What type of bike is a Trek bike?
In terms of mountain bike technology, Trek is the market leader. It should come as no surprise that our mountain bikes are the most cutting-edge products available. Here, only the most expensive MTB models are exempt from innovation. Any ride, on any trail, will be better thanks to the numerous features and nuances that come standard on every Trek mountain bike.
What does Trek FX stand for?
The Trek FX series of hybrid bikes are a terrific ride for exercise or commuting at a reasonable price. They are designed to satisfy any riding need.
How do you shift gears on a trek fx1?
You progress to tougher (smaller) gears by pulling the tiny lever. Your front gears are moved by your left levers. You are moved to the larger, harder ring by the large lever. You are moved to the smaller, easier ring by the tiny lever.
Conclusion | TREK FX 1 Hybrid Bike Review
4.7
Total score
Our Rating
The Trek FX 1 is a fantastic option if you’re seeking for the ideal commuter or training bike. One of Trek’s best-selling lines, the FX series is a bike you’ll use for many years to come.
Shimano’s dependable shifter and derailleurs provide a smooth, quick, and reliable ride on a light, agile frame.
The Trek FX 1 is the ideal choice if you want a reasonably priced bike that handles, performs, and looks like a mid-range bike.
This is a superb specimen all around. The Trek FX I Hybrid Bike offers you a wealth of experience and is quite versatile in terms of function, from appropriate riding to exercising or simply commuting. It has fast-rolling smooth tyres, a DuoTrap S that enables you to add an integrated sensor to track its speed, is lightweight, and has a high-steel fork with a mount disc connector for simple wheel installation. And it’s all offered in a wonderful package at a reasonable cost.


Contact Us
If you have any suggestions or advise, please feel free to reach us via our Contact Us here.
2022 Tour de France: How Time Has Evolved The Tour
2022 Tour de France: List of Participating Teams
Understanding the 2022 Tour de France: A Comprehensive Guide
2022 Mountain Bike | Trek 820 | Review
Buying A New Bicycle? There Are 11 Things You Should Consider
2022 Tour de France: Jerseys And Their Meanings
Tour de France: All Winners Since Beginning 1903
Tour de France: Interesting Historical Facts
What You Need To Know About Tour de France
The Origins Of The Tour de France
Tour de France: FAQs
The Tour de France has confirmed a Netflix series and eight teams that will compete
How To Install Bike Computer
You may not know how to setup and install bike computer properly or you may just want to make sure everything was done correctly.
It’s not always easy to install bike computer, and there may be several obstacles in your way of doing so for your road or mountain bikes.
Small computers that you may attach to your bicycle to measure the rotation of your tyres are called bicycle speedometers. Your speed is determined by the computer using data from sensors that are installed on your bicycle tyre. Other details like your mileage, the time, your heart rate, or the altitude are frequently provided by these computers. Even if you are not a bike mechanic, installing a speedometer is simple. However, in order for the sensors to accurately measure speed, your computer needs to be properly programmed. Bring your bike and computer to a bike shop if you are unsure of your abilities to install a cycling computer.
Table of Content
In this guide we have covered the following areas to properly install bike computer:
- Tools you need to install bike computer
- Instructions and tips to install bike computer
- Sensor Alignment to correctly install bike computer
- Front Mount Cable Routing
- Rear Mount Cable Routing
- Bike Computer Installation FAQs

Tools Use To Install Bike Computer:
You need simple tools to complete this small and easy task.
- Wire cutter
- Soldering iron
- Stripper or knife
- Solder
- Bicycle tools
- Cable Ties
Instructions And Tips To Install Bike Computer:
Although attaching a computer can be challenging, we’ve attempted to make the process below as simple as we can. You’ll be cycling with your new little computer in no time if you follow the instructions. A wireless computer can be a better option because they are considerably simpler to set up.

Sensor Alignment
- Depending on the spoke arrangement of the wheel, you typically have a choice of numerous locations on the wheel to attach the spoke magnet with one-magnet cycle computers. In general, mounting the magnet as close to the hub as possible is recommended. It will travel by the sensor more slowly the closer in you attach it, allowing the magnetic switch on the sensor more time to react. The computer may provide unpredictable results at greater speeds if the magnet is too far away.
- Attach the sensor to the fork or stay once the magnet has been fitted. Before securing the wire or fastening the mounting shoe to the handlebar, test the computer and make any necessary adjustments to the sensor or magnet position.
- Plastic tie-wraps are typically included with cycle computers to fasten the wire to the frame. These function reasonably enough, however unless they match the color of the frame, they look awful. If you secure the wire with clear plastic tape, your work will look better and be more professional. I’ve discovered that clear mylar package-sealing tape works the best. It is often offered in 2-inch broad rolls with a convenient dispenser / cutter. Before taping the wire down, wash your hands and make sure the essential frame and fork components are clean.
- Turn the bike over in the repair stand with the sensor magnet and magnet placed before removing the front wheel. The wire can be secured more easily as a result.
Front Mount Cable Routing:
- The wire should incline slightly inward as it climbs the back side of the fork blade. This makes the wire less obvious while also making it more aerodynamic. Make sure the wire crosses back on the inside of the fork blade if the sensor is installed in front of the blade. Just in case later modest sensor adjustments are required, leave a very small amount of slack between where the wire exits the sensor and where you start to tie it to the fork.
- The most typical error in wire routing is to fasten the wire to the frame’s head tube. With a front-mount cyclometer, you should never do this since it forces you to leave two sizable loops of slack where the wire enters and exits the head tube so that it won’t be pulled as the handlebars rotate. The front brake cable should always be followed by the wire. The wire can be secured all the way along its length because the fork, brake, and handlebars always move simultaneously.
- Typically, I like to run the wire up the back of the brake cable and attach it to the cable securely. The extra wire can be wrapped and tucked into the steerer tube’s bottom if it is longer than is necessary.
- It is more convenient to wrap the wire around the brake cord in a spiral for bikes that are likely to be serviced frequently. This makes it simpler to unplug the cable for tasks such as replacing handlebars or servicing a headset. The spiral wrap method has a drawback in that it can be unsightly, especially on bicycles with brightly colored brake cable housing.
- Install the magnet and sensor on the left side, if possible, when mounting a front-mount cyclometer on a bicycle with cantilever brakes. This enables you to run the wire in along the left side of the transverse cable and out along the back of the cantilever to the main cable. It will still be possible to release the brake for wheel changes by unhooking the transverse cable because the transverse cable is often fixed on the left side of front cantilevers.
- Cyclometer mounting is actually simpler on suspension forks. Follow the cable housing to the handlebar after running the cable up the slider to the brake bridge.
- Some cycle computer sensors won’t fit the suspension forks’ large-diameter legs. You were right to keep any old, useless front derailers in a box if you have them. Instead of the hinged clamp found on more recent models, many older front detailers were fastened to the frame using two bolts that passed through a “pillow-block” type clamp. To secure the sensor to the fork blade, two of these clamps placed back-to-back can create an extremely sturdy, tasteful-looking clamp. You must need a tiny shim if the fork blade is less than 1 1/8″ in diameter.
- If all of that bothers you, a rear-mount kit is a simple method to mount a cycle computer on a suspension bike.
Rear Mount Cable Routing:
- To keep them hidden, wires from rear-mount cycle computers or cadence pickups should be run under the free hub, the bottom bracket, and the down tube.
- Attach the wire to one of the gear-change cables that run from the down tube to the handlebar-mounted shift lever on hybrid or mountain bikes.
- It is typically best to run the wire from the down tube directly to the bottom of the front brake cable on bikes without handlebar-mounted shifters, and then proceed as with front mounts. The wire must have enough slack to allow the handlebars to turn as far as they can without being pulled in either direction, otherwise the wire will break.
- Keep the slack loop away from the tyre. If the wire is able to touch the tyre, it will, and it will quickly wear away to nothing.
- The rider could unintentionally tug on the wire while trying to shift if the slack loop is not kept out of the way of the down-tube mounted shift levers’ regular operation.
Additional Information, if needed:
If you need additional information on setting up the bike computer, watch this video tutorial on youtube.
Install Bike Computer FAQs:
How does a wireless bike computer work?
A cycle computer operates in an easy manner. A signal is produced each time a magnet on the wheel moves past a sensor on the fork. Based on the wheel dimension you entered while setting up the bike computer, it calculates your speed by timing the intervals between those signals.
Where do you mount a computer on a mountain bike?
Many Garmin cycling computers come with a stock mount that enables the device to be installed in a variety of places, including the handlebar, atop the stem, or even on the top tube. Some endure racers choose mounting the computer on the top tube because it protects it in the event that their bike rolls away from them.
Where should I place my bicycle computer?
It’s best to keep things simple by mounting the sensor on the front wheel because a wire can be routed to the front fork much more easily than the back fork.
Do bike computer need sensors?
To transmit heart rate information to your bike computer, you’ll need to link it to either a chest strap or a fitness tracker with a wrist-based sensor.

Contact Us
If you have any suggestions or advise, please feel free to reach us via our Contact Us here.
What Is A Bike Computer And How Do Bike Computer Work?
Have a new cycling computer, or are you simply unsure of your setup? We’re here to assist you in determining the ideal method to configure your cycle computer for the types of riding you do because it can be challenging to precisely know the metrics you need to have in front of you to maximize the functioning of the device.
Even if it’s just how long or quickly they ride, many bikers are intrigued about their data. A handlebar-mounted bike computer may provide you with a wealth of information about your ride, including performance information like cadence and power, much like the dashboard display in a car. Numerous websites also provide navigational tools, such as turn-by-turn directions for your journey.
Table of Content
In this article we have covered the following areas on Bike Computers:
- How Necessary Is a Bike Computer?
- Features Of Bike Computer:
- How Does A Bike Computer Work?
- Use Of Orientation Sensors:
- Additional Resources For A Bike Computer:
- Brands For Bike Computers:
- Computerized Training Programs For Cycling:
- Setting Up Your Bike Computer:
- How To Handle A Non-Working Bike Computer:
- Bike Computer FAQs:

How Necessary Is a Bike Computer?
The answer is “yes” if you’re truly into cycling, especially at a competitive level, or if you routinely go on long training rides and want a full range of data on those trips. This is because you’re the target market for bike computers. The object in your hand—your phone—or the device on your wrist—if it’s a fitness tracker—can, however, also offer input regarding your rides. Both of those solutions can help you save some money and may provide all the information you require.
Features Of Bike Computer:
CURRENT SPPED
The speed at which you are moving. Maximum speed is the top speed you’ve ever reached.
Measures the average speed, during a journey. Choose again if you like miles per hour or kilometers per hour. In addition to showing, you your speed, it can assist you in curbing your overconfidence when riding in a group or simply provide you a little extra motivation when riding alone.
WEATHER INFORMATION
Provides you with updates on the present and upcoming weather
ELAPSED TIME
This one seems self-explanatory, but it’s simple to mix up the timer, elapsed time, movement time, and, come to think of it, all the other times. The timer, unlike the elapsed time, only runs in tandem with the activity; for instance, if you enable auto-pause, the timer will pause when you are not moving. We advise utilizing the timer because it displays the real amount of time spent pedaling rather than how long you were out and about or sitting at the bar.
ODOMETER
Determines the distance covered.
CALORIE COUNTER:
Estimates the number of calories you have burned.
TURN BY TURN NAVIGATION
Like a car in that it provides real-time location updates.
GPS LOCATION
Provides maps of your current position and your destination.
CLOCK
If you set a timer, this displays how long you have been riding or how much time is left.
COLOUR DISPLAY
Instead of appearing in black and white, your display will be in color.
WIRELESS COMPATIBILITY
Not operating with a wired connection (most units are wireless)
BACKLIGHT
When it’s dark, keeps your display well-lit.
BATTERY LIFE
How long the bike computer can operate before the battery dies.
CADENCE COMPATIBLE
Your pedal revolutions per minute are indicated by your cadence. Putting cadence on your primary screen can be a little kick in the pants to change gears and get those legs spinning at a more efficient speed if you tend to spin your legs a little slowly.
STRAVA INTEGRATION
Fitness tracking with social network integration.
ELECTRONIC SHIFTING INTEGRATION
Instead of using metal wires to shift the gears, use miniature electric motors.
ALTIMETER
Determines your elevation or altitude above sea level.
MOXY SENSOR
A small, wearable sensor that monitors oxygen levels in the muscles.
TOUCH SCREEN
May use touch to control bike computers.
HEART RATE
If you genuinely own and use a heart rate monitor, only add this one. This is an excellent one to have on your main screen whether you’re doing training to heart rate zones or just want to see how much deeper you can go. Just be careful not to make it too enormous so that your riding companions can see how much work you’re putting in.
WI-FI
May use Wi-Fi to access the internet for updates.
RIDER TO RIDER CONNECTIVITY
Enables remote communication with other riders.
How Does A Bike Computer Work?
Most bike computers measure how long it takes for your wheel to rotate using a magnet and a sensor. The size of your tyre can then be used to determine data like your current speed; distance travelled, and average speed. They can, however, communicate with a variety of sensors to monitor your cadence, power, GPS location, and even your heart rate.
A bike computer’s ability to inform you how fast you are moving and how far you have travelled is its most crucial feature. There are primarily two ways they will make that happen.
Use Of Magnet And Sensor:
On either the front or rear tire’s spoke, the magnet is mounted. Here is an article I wrote about placing your sensor correctly if that is more of your focus.
Simply put, the sensor is a unique type of switch. Every time it comes in contact with a magnet, it completes a circuit and transmits a signal to the computer.
The most prevalent magnetic switches are reed switches. The typically open leads become polarized and attract one another when a magnetic field approaches. By doing so, the circuit is closed and the signal is sent to the computer. The least expensive magnetic switches are reed switches.
Use Of Orientation Sensors:
Some businesses, like Garmin, provide speed sensors that use wireless orientation sensors in place of a magnet and a magnet switch. The sensor may be attached to the hub of a wheel and will signal your computer as the wheel revolves.
Additional Resources For A Bike Computer:
POWER METER:
Cycling involves applying a force across a distance to generate power. When using a pedal power meter, the amount of pedaling you are doing is multiplied by how hard you are pedaling. The majority of the sensors that gauge these factors are built into your pedals or cranks. They use ANT+ or Bluetooth Low Energy to send their results back to the bike computer.
CADENCE SENSOR
Almost identical to speedometers are cadence sensors. Instead of monitoring the rotation of the wheels, they time how long it takes for your pedals to rotate. They can do this by using magnets, orientation sensors, and occasionally pressure sensors.
HEART RATE MONITOR
One of two methods is employed by heart rate monitors. They either detect your blood flow using LEDs and sensors or they sense the electrical signals that your heart sends out when it beats. Your heart rate monitor is most likely measuring electrical signals if it wraps around your chest. The LED approach is usually used for tracking heart rate with a smart watch though.
Top Recommended Brands For Bike Computers:
When you purchase a bike computer, you’re making an investment in the product’s brand and interface in addition to the actual equipment. Numerous companies have their own websites, user interfaces, applications, and UIs that connect to your bike computer and gather data from it.
Similar brands to those that dominate the vehicle GPS market dominate the cycling GPS market. The leading company is Garmin, but other names including Wahoo, Polar, Bryton, Suunto, Lezyne, and CatEye also make GPS-enabled products.
Computerized Training Programs For Cycling:
Cycling computers can help with training primarily and most commonly by connecting to a power meter or heart rate monitor and providing real-time data on your power output or heart rate while you cycle.
Setting Up Your Bike Computer:
ON WHEEL:
Unless you have a wired sensor, it won’t make much of a difference whether the sensor is on your front or back wheel. Then there are a few things you might want to think about.
First off, placing the sensor on your front tyre will require the least amount of setup because it is simpler to feed a cable through it. The disadvantage of this is that you will always have extra wire that needs to be wrapped around your fork because it is always long enough to reach the back wheel.
As we’ve already stated, it makes no difference to you or the performance of your bike computer whether you route the wire to your back wheel or not if you want it to seem a bit neater.
EDGE AND CENTRE:
The magnet on the spoke goes past the sensor much more slowly when it is mounted closer to the rim than when it is mounted towards the hub (the centre of the wheel). As a result, the sensor will have to travel over it more slowly, giving it a better chance to read the changing magnetic field. This improves reading accuracy, especially at faster speeds.
The propensity won’t be as strong, though, if the magnet is placed close enough to the hub; instead, it will be much farther away and fly out to the rim. Therefore, mounting it as near to the rim as you can could be best.
If you need additional information on setting up the bike computer, watch this video tutorial on youtube.
How To Handle A Non-Working Bike Computer:
Your issue is most likely caused by the magnet not approaching the sensor close enough. The magnet frequently moves up and down the spoke or rotates around it.
Other frequent issues include a broken cable or screen, in which case visiting a bike shop is usually the best option to have it fixed.
Another possibility is that your battery is dead. Bicycle computers frequently employ inexpensive batteries, which have a limited lifespan. Fortunately, replacing them doesn’t cost a lot of money.
Bike Computer FAQs:
What is a bike computer used for?
Based on the wheel size you gave it during initial setup, the bike computer calculates your speed based on the interval between those signals. The computer can calculate a wide range of data from that measurement, including distance, average speed, riding time, and maximum speed.
Do you really need a bike computer?
It’s not necessary to carry around more gear if you only cycle one or two days each week. However, if you’re training for a race and ride your bike five or six days a week, a cycling computer will provide you with more pertinent statistics. The road may be a dangerous place.
How accurate are bike computers?
It pledges to transmit the GPS signal into space with a 95% probability and a global average user range error of less than or equal to 7.8 meters.
Do bike computers need sensors?
The majority of bike computers measure how long it takes for your wheel to rotate using a magnet and a sensor. It can then compute information like your current speed, distance travelled, and average speed using the size of your tyre.
Can you use a bike computer for walking?
There are several restrictions with Garmin Edge bike computers for hiking. The software is designed for cycling and struggles with arm movements at low speeds. As a result, it has trouble estimating the walking distance. There is no “walking/hiking” profile integrated into Garmin Edge devices.
What is a bike computer called?
A device attached on a bicycle that calculates and displays trip information, similar to the instruments in a car’s dashboard, is known as a cyclocomputer, cycle computer, cycling computer, or cyclometer. For convenience, the head unit, a computer with a display, is typically fastened to the handlebar.
What should I look for in a bike computer?
Common bike computer features are
Current speed.
Maximum speed.
Average speed.
Elapsed time.
Trip distance.
Odometer
Clock
Wireless compatible.
Why is my bike computer not working?
The majority of issues may be resolved fairly quickly. Most cycle computer issues can be attributed to one of three common causes: battery issues, wiring issues, or magnet and sensor misalignment.


Contact Us
If you have any suggestions or advise, please feel free to reach us via our Contact Us here.
How To Hang Bike On Wall
It’s practical to store your bike on wall to conserve space and protect it from harm. You should use a bike rack or a bike hook to safely hang your bike on the wall. You’ll have more free space and simple access to your bike anytime you’re ready for a ride after using a drill to correctly install the mount for your bike.

Table of Content
In this article we have covered the following areas on how to mount a bike on wall:
Effective Way To Mount A Bike On Wall:
Hanging a single road bike by the front wheel in your home, garage, or shed is the ideal approach to place it on a wall. This is the most affordable and practical option, and it should save you room while protecting your prized possession from dents and scratches.

Why it’s crucial to understand how to hang bike on wall:
You make the decision one day that the bicycles need to be hung in the storage space. They take up a lot of space and if you unintentionally knock them over, you risk damaging them or possibly hurting yourself. You can’t keep resting them against the wall.
Although safety and making the most of limited space are frequently the driving forces, with the right application bicycle hooks can even turn a bike into a feature of your home’s interior design.
Procedure 1: Installing A Bike Rack:
- Purchase a bike rack for the wall either online or at your neighborhood hardware store. Depending on how you wish to keep your bike, pick a vertical or horizontal wall mount. If you want to save wall space, a vertical bike rack is an excellent choice. If you want your bike to hang flat against the wall, pick a horizontal bike rack. If you want, you could even construct one.
- Take a tape measure to the bike. If you’re using a vertical bike rack, measure the bike’s length; if you’re using a horizontal bike rack, measure the bike’s height.
- Place the bike rack in the desired location on the wall. If the rack is too high, the bike may hang so that it touches the ceiling. Once the rack is in place, make a mark where each screw hole corresponds to a wall stud. Two screw holes are common on bike racks.
- Make sure the space between the floor and the horizontal rack, if you’re using one, is greater than the height of the bike.
- Make sure the space between the floor and the vertical rack, if you’re using one, is greater than the length of the bike.
- At the locations you marked, drill into the wall with a drill. Make sure the holes you drill are big enough to accommodate the entire length of the screws. Use a drill bit that is just a little bit smaller than the bike rack’s included screws.
- Power drills are available online here.
- Use a 5mm drill bit, for instance, if the bike rack comes with 6mm screws.
- Each hole you drilled will now have a wall plug in it. The wall plugs will provide something to hold onto for the screws you’ll use to mount the bike rack. Use wall plugs with the same thread size as the bike rack’s included screws. Wall plugs are available at your neighborhood hardware store.
- Screw the rack into place after positioning it over the holes. Put the bike rack’s included screws into the wall plugs using a screwdriver. As soon as the screws stop spinning, keep turning the screwdriver.
- On the bike rack, hang your bike. Hang the bike by the front tyre if you’re using a vertical bike rack. Put the top tube of your bike’s frame on the rack if you’re using a horizontal bike rack.

Procedure 2: Using A Bike Hook:
- Purchase a bike hook that can support the weight of the bicycle. The maximum load capacity should be indicated on the packaging of the hook. Use only hooks designed to support the weight of the bike; otherwise, the hook may pull out of the wall.
- Bike hooks are available online here or at your neighborhood hardware store.
- If you’re unclear of the bike’s weight, weigh it on a bathroom scale. Weigh yourself alone first, and then weigh you while holding the bike. Your bike’s weight is determined by deducting your weight from your combined weight and the weight of the bike.
- To find a stud in the wall, use a stud finder. A stud finder is available at your neighborhood hardware store. When the stud finder shows that a stud has been discovered, place it on the wall and slowly move it around the surface. When they are near a stud, stud finders typically emit a beeping sound or light up. For detailed instructions on how to use your stud finder, read the instructions that came with it.
- Measure the bike’s length with a tape measure. From the front tire’s farthest tip to the rear tire’s farthest tip, measure the distance.
- Where you want the bike hook to be screwed into the wall should be marked with a pencil. Make sure it’s along the stud you discovered. Make sure the distance between the floor and the bike hook is more than the length of the bike because it will be hanging vertically.
- Make a mark, and then drill a hole there using a 3/8 inch (.95 cm) drill bit. Make sure the hole is large enough for the bike hook’s whole screw end to fit.
- Once you’ve drilled the hole, tighten the bike hook into it with a screwdriver. Turn the bike hook clockwise until it can no longer be turned after inserting the screw end into the hole. The hook itself should be parallel to the ground.
- On the bike hook, hang the bike. Place the bicycle’s front tyre on the hook with the tyres in contact with the wall and the seat facing away from the wall.

Conclusion:
Whether you ride a road bike or a mountain bike, a wall mount is a need for bike storage. Bike racks are among those basic tools for each cyclist.
If you have a small area inside which to store your bike, it is ideal. Only some mounting hardware, drill holes, and screw holes are required to install it to the wall, whether you support it by the front or back wheels.
Mount Racks for bike on wall FAQs:
Is it OK to hang a bike by its wheels?
Hanging a bike up by its wheel is no problem at all. The wheel is designed to take loads far in excess of the weight of the bike. The only potential problem will be if the bike is held upright by the tyre and the tyre goes flat!
How can I hang 2, 3, 4, or even 5 road bikes?
On a wall-mounted bike rack, road bikes can be kept quite near to one another, saving space and preventing damage to the bikes. Starting with a rack for just two or three bikes makes it simple to install hooks for additional bikes using just an Allen key and no further drilling. 5 bikes may fit on the Gear Hooks bike wall mount rack in just 1 meter of wall space. You can swing the bikes left and right to make them simpler to get to or even hang alternating bikes upside down, by the rear wheel.
How can I hang my bicycle on wall?
By far the most affordable option, a screw-in storage hook for your wall or ceiling is a simple yet effective way to hang your bike off the ground and out of the way. Use just one hook to hang your bike vertically or two to hang it horizontally. For the ultimate floor—and wall—space saver, hang your bike up.
Can you damage a bike by hanging it?
Concerned cyclists have pondered this question since the rise of bike theft and the decline of secure storage space for bikes. In short, the answer is no. Hanging your bike by its wheel will not damage it. At least, it won’t hinder your bicycle’s performance, with a few minor exception
Is it OK to store bike vertically?
The ideal storage solution will depend on your available space: garage, house, apartment or storage shed. Each has different applications, but in general, racks that let you store your bike vertically, wheels perpendicular to the wall, ideally positioned in a corner, take up the least space.
Is it OK to hang bikes upside down?
Shimano even recommends against turning the bicycle upside down. In a manual for its hydraulic disc brakes it says: “The disc brake is not designed to work when the bicycle is upside down. If the bicycle is turned upside down or on its side, the brake may not work correctly, and a serious accident could occur.


Contact Us
If you have any suggestions or advise, please feel free to reach us via our Contact Us here.
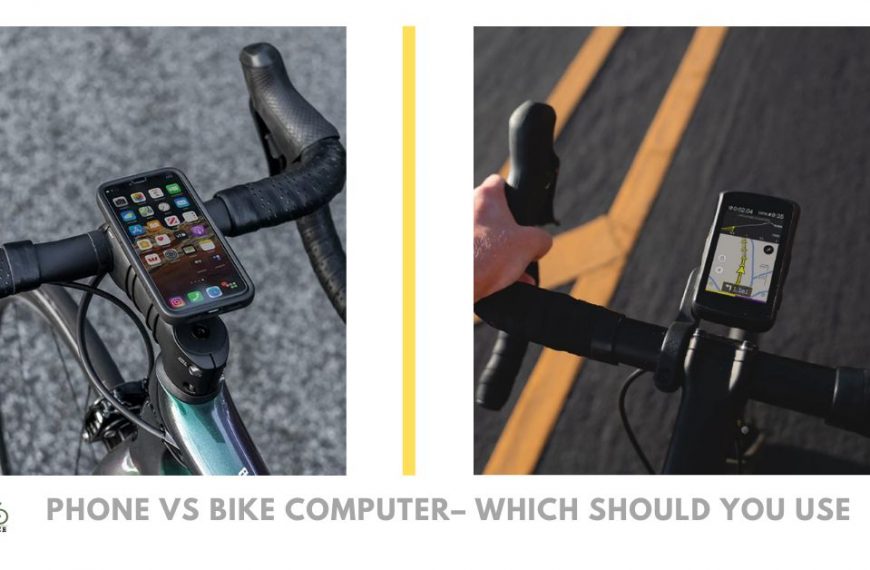
Smartphone Vs Bike Computer – Which Should You Use
Cycling enthusiasts used to record their rides using specialized equipment, which by today’s standards was quite primitive and could only measure speed and distance.
These days, you can record what seems like every measure imaginable to gain a staggering amount of knowledge into your riding performance. The days of using a paper map while driving seem to be long gone for the majority of us. With GPS bike computers and the most recent route-building software, navigation is a breeze.
Which device—a Smartphone or a bike computer—is preferable for recording bike rides? I’m not the only one who simply adores bike computers. Given that the majority of us carry Smartphone that can record bike rides with the correct apps, it is reasonable to wonder whether anyone actually needs a bike computer any more. When you already have an expensive, multifunctional smartphone in your pocket, why would you want to spend additional money on a bike computer? This is a great question, and in this piece I’ll compare recording your rides on your Smartphone versus a bike computer. Which device—a Smartphone or a bike computer—is preferable for recording bike rides? I’m not the only one who simply adores bike computers.
WARNING:
I won’t claim that one is superior to the other. I firmly believe that the decision is based on your own needs and, of course, your financial situation. In light of this, I’ll weigh the advantages and disadvantages of both strategies so you can make your own judgment.
Table of Content
In this guide we have covered the following areas for Smartphone vs Bike Computer:

EIGHT THINGS TO CONSIDER:
There are heaps of factors to consider before making comparison between smartphone and bike computers. Such as following:
1. PRICE:
Bicycle computers range in price from $40 for simple speed and distance recorders to over $300 for feature-rich GPS computers that can do anything from record rides to recommend rest periods.
Given that Smartphone are frequently among the most expensive items we own and do many of the same tasks as smart watches or bike computers, purchasing a second gadget may seem like a needless extravagance. On the other hand, purchasing a specific cycling accessory and protecting your Smartphone from danger may seem like a worthwhile investment.
2. SIZE:
Typically, a smartphone will weigh a little bit more and occupy a little more space on your handlebars than a bike computer. On the other side, if you are elderly, a smartphone’s screen might be easier to read than a tiny bike computer.
However, a lot of more expensive bike computers enable you design a screen that only displays the information that matters to you, including speed and power. It’s actually simpler to view those kinds of personalized data displays than a Smartphone app.
3. DURABILITY:
If you ride a bike frequently enough, you’ll eventually find yourself biking through snow and rain. Bicycle computers and specialty cycling watches are made to endure inclement weather.
If you plan to use a Smartphone while riding, you can put it in your pocket, but hiding it won’t do anything to aid with navigation. Of course, a specific bike smartphone mount can be used to attach a Smartphone to the handlebar.
Resilience is another consideration, and bike computers are made to endure potential shocks. Nothing compares to rummaging through stinging nettles to recover your bike computer after a fall.
4. BATTERY LIFE:
If your smartphone’s brightness is set to a high level to combat sun glare, it generally won’t last more than 4-5 hours without a portable charger. If you’re a distance rider, the battery life of a smartphone just won’t cut it, so you should instead choose a GPS bike computer. If you’re going on a long ride far from home, you’ll also need your smartphone battery to be high in case of emergencies.
5. SENSORS:
While some of the essential information is provided by cycling apps, sensors are essential in providing you with data on your speed, cadence, and other variables.
While there aren’t any sensors that can measure power, speed, cadence, or heart rate when using Bluetooth and Smartphone, if you already have ANT+, your smartphone won’t support this either.
Your options are restricted because platforms like Strava disabled third-party support, so you won’t have any of that data to utilize there. You could possibly buy a third-party dongle to put into your smartphone and receive the data that way.
But if you don’t care about ANT+ much and can use Bluetooth, this is a good option for your sensors. You’ll need to locate an app that shows data while you’re riding and lets you export it for analysis afterward.
Since a dedicated bike computer would automatically connect and display the data on many screens that can be easily interpreted, using a smartphone with sensors is possible but not as simple as it is with a dedicated bike computer.
6. NAVIGATION:
A Smartphone with a specific cycling app, like Komoot or Strava, can be used to navigate while biking. The greatest bike computers frequently feature extensive maps preinstalled that resemble topographic maps and include specific routes, trails, waypoints, and facilities.
Some bike computers let you drop a pin and will automatically guide you to your destination, while others need you to create routes via an app and send them to the bike computer.
It’s important to keep in mind that many computers only have a limited number of map territories installed onto them, so if you plan to travel to new areas, you might need to buy additional maps.
7. ACCURACY:
When comparing a trip recorded on a cycling computer using GPS to a ride recorded on a smartphone using GPS and an app, it’s not uncommon for people to notice discrepancies in average speed and even distance. The quality of the GPS data is mostly responsible for the variations.
Computers typically determine average speed within the device itself, but after the file is uploaded, Strava performs its own analysis of the data, taking into account both the overall activity distance and the observed movement time.
Whichever is more accurate, according to Hawkins, “depends on the electronics inside the bike computer and the GPS signal from your smartphone.”
The GPS system, which combines the chip in your device and the satellites above the Earth, may function differently from day to day, according to a statement made by Strava in its help pages.
Cycling computers typically use barometric altimeters to measure atmospheric pressure to determine height; accuracy can be impacted by the weather, among other things.
8. COMPATIBILITY:
Functional Threshold Power (FTP), VO2 max, power-to-weight ratio, and training zones can all be discovered by pairing your bike computer or smart device with a power meter or heart rate sensor.
You can monitor and manage your indoor training using a variety of gadgets that can link to a smart trainer. Most of the time; Bluetooth will be used to link supplementary devices to your smartphone, bike computer.
Even while connecting devices has become simpler over time, it’s important to note that some power meters only use ANT+ and won’t work with certain Smartphone.
However, a lot of bike computers and smart watches use Bluetooth to connect to Smartphone. Companies like Wahoo and Garmin have apps for your smartphone that allow you to update and manage their products. These companies also provide push notifications to your bike computer or watch for incoming calls and texts.
BIKE COMPUTERS:
Bike Computer Pros:
- Bicycle computers excel where other smart gadgets fail because they are weatherproof, crash-resistant, and engineered to fit on handlebars.
- For certain riders, recording GPS data is also crucial, and bike computers have plenty of battery life to accomplish just that. Also easy to use are today’s huge touch screens.
- It’s doubtful that there will be any compatibility concerns if you want to take your training to the next level with a power meter or cadence sensor because bike computers can connect to almost any other smart cycling gadget.
Bike Computer Cons:
- Bike computers don’t really have any drawbacks when it comes to cycling, but there are a few things that can discourage you.
- The price of a bike computer may be deterring if you’re just starting out, shopping on a tight budget, or don’t intend to go on long rides given that your Smartphone can do many of the same functions.
- A wristwatch might be a better use of your money if you run or engage in any other sports because a bike computer is also only made for riding.
SMARTPHONES:
Smartphone Pros:
- Since the vast majority of people already own a Smartphone, using one instead of a bike computer is far more practical.
- It is much simpler than looking around for a bike computer to just download a Smartphone app that tracks a lot of the same bike ride data as many bike computers.
- It’s now simpler than ever to learn more about your performance because so many heart rate monitors and power meters can now link to recording devices via Bluetooth.
Smartphone Cons:
- The impact GPS usage has on battery life is the largest disadvantage of using a Smartphone to record your journeys. Your battery will be completely depleted after just a couple of hours of installing and using a GPS programmed, preventing you from taking extended trips.
- A Smartphone is an expensive item, and they aren’t made to endure extreme weather conditions or drops. Therefore, mounting it on your handlebar exposes it to various weather conditions. Furthermore, there is a considerable probability it will fall off and crash if it is not adequately fastened.
- While many of the important parameters seen on GPS bike computers, such as average speed, distance, etc., can typically be matched by smartphones. They don’t go into detail on some of the more sophisticated cycling data that might be useful if you take your biking seriously.
- Some gadgets can link to cell phones, but not all of them. So if you wish to purchase any additional gadgets, like a speed sensor, relying solely on a Smartphone can cause some problems.
Victory Between Smartphone Vs Bike Computer
Now that we’ve examined cycle computers and Smartphone, it’s time to say for sure which the right approach is.
You don’t need to worry too much about spending a lot of money on a top-of-the-line bike computer only to acquire the data you need because the majority of bike computers come with all the functions you’ll need, from speed and time to turn by turn navigation.
With a dedicated bike computer, you can go on all kinds of road excursions without having to worry about running out of battery life. These computers are made to handle the tough terrain you’ll probably experience on your mountain bike.
Smartphones are undoubtedly more practical and do provide the same information as bike computers, but if you’re serious about cycling, they’re simply not the best option.
They require far more frequent battery changes and are much more prone to damage than a bike computer. Therefore, a cycle computer is an essential piece of equipment if you routinely workout or participate in cycling events, trails, etc.
Alternatively, if you only bicycle once a week for 30 minutes or to work, you probably don’t need a bike computer and can check your data on your smartphone instead.
In general, a cycling computer is the best option and will be more useful to you than a Smartphone. Thus, the bike computer is unquestionably the winner in the Smartphone vs. bike computer comparison.
Smartphone vs Bike Computer FAQs:
Can I use smartphone as bike computer?
An Android app called Jepster turns your Smartphone into a bike computer. It employs GPS to provide you with up-to-the-minute performance data on your journey. You can track your progress while enjoying your trip thanks to a variety of features in this app.
Is bike computer necessary?
No, not always. Other than a bike, you really don’t need much to ride. However, bike computers are practical tools that provide you access to a wealth of information and navigation features that are either absent or insufficiently present in your other devices.
Are bicycle computers accurate?
Although the distance reading is directly derived from the rotation of a bicycle wheel, it is never precisely reproducible.
Do I need a bike computer for power meter?
To display and store your power and ride data, all power meters require the usage of handlebar-mounted bike computers.
What should I look for in a bike computer?
Common bike computer features
Current speed.
Maximum speed.
Average speed.
Elapsed time.
Trip distance.
Wireless compatible.
Can Strava replace bike computer?
The news from Strava on Friday afternoon that if you manage to destroy your bike computer or phone while riding your bicycle, Strava will now pay to get that gadget fixed or replaced is one of the things I didn’t see coming. Actually, it’s a company they’ve worked with, not Strava.
Can you use a bike computer for hiking?
It is not recommended to use a Garmin Edge GPS bike computer for hiking. Even with auto-pause turned off, it struggles to record low-speed movement and automatically filters out GPS drift. The distance displayed and recorded won’t be exact even when the map tracking is accurate.


Contact Us
If you have any suggestions or advise, please feel free to reach us via our Contact Us here.
Various Types Of Bike Computers
You can free up valuable space in your home or garage with the help of our wall bike mount rack. The size of bicycles when they are horizontal makes them challenging to store. This issue can be resolved by mounting your bike against a wall.
In addition to protecting your bike by storing it by its wheels (rather than its rims or spokes) when you lift it off the floor, wall mount bicycle racks also free up your floor space for a variety of other activities. Just think of what you could do in a garage or shed with extra floor space to use for the other activities you enjoy.
Table of Content
In this guide we have covered the following areas for building a wall bike mount rack
TOOLS AND MATERIALS:
To create the best possible Handmade accessory drawer-equipped wall bike rack. Although you can adjust this bike rack to support the front wheel or handlebars if you’d prefer, it will hang the bike up by its top tube. The garage or a nook in a room is the ideal places to keep it. The good news is that you won’t need to significantly harm your wall because there are only two screw holes in the wall. Always keep in mind that you can add your own spin to the concept.
Generally speaking, you won’t require anything extravagant. You’ll need a sheet of 3/4-inch plywood that is 4 feet wide and 4 feet height for the task. Now, you’ll need a 10-1/2-inch-long 2×5 board, to ensure it’s short.
Choose veneered plywood for a stylish bike rack because of its smooth surface. Choose CDX plywood and fasten it to the edge of a stud if you want rough, unfinished wood.
TOOLS:
- Drill
- Jig Saw
- Miter Saw
- Clamps
- Table Saw
- Tape Measure
MATERIALS:
- 2 x 6 Wood or Lumber
- 2” Trim Head Screw
- 4’ x 4’ 3/4” Plywood
- Wood Glue
SAFETY PRECAUTIONS:
Priority one is safety: You will always require tools, and under no circumstances should you use them without the proper protective apparel, regardless of which project is next on your list or which DIY task you simply can’t put off any longer. The accessories that are a must-have for each tool are listed in our guide.
- Every time you are drilling, safety goggles and earplugs are a must.
- When using our surface-processing equipment, such as a multi-sander, always wear a mask.
- When undertaking any decorating tasks, protective clothing’s, equipment is also necessary.
- Always use eye protection: When operating the majority of instruments, safety goggles are required.
STEPS TO BUILD BIKE MOUNT RACK ON THE WALL:
Setting up your workspace in advance is simpler. Whether your bike is mounted vertically or horizontally, be sure you have adequate wall space to accommodate it. Make sure the bike won’t be blocking any windows or doors, or even in a hallway where it might irritate you, by experimenting with different height settings. To ensure that it fits your bike, measure it using a tape measure.
These are basic techniques that anyone may learn to make this bike rack, novice or expert alike. Although they are not difficult to pick up, if you have never used them before, you might want to try using them on some scrap wood first to get control.
CUTTING AND SAWING:
A table and miter saw are featured in the list of instruments since they are ideal for giving you a clean cut for a high-quality finish.
If you’d rather, you can just use a jigsaw or circular saw, but a clean finish will be more challenging to achieve. Although for a smooth appearance, you could just sand the edges down. Depending on your level of expertise, you ought to be able to finish the sawing in one hour. For putting in the screws, you’ll also need a drill with the appropriate drill bit.
| REF | AREA | DIMENSIONS | MATERIAL | QTY |
| 1 | TOP & BOTTOM | ¾” x 10.1/2”x 16” | 3/4” plywood | 2 |
| 2 | SIDES | ¾” x 7” x 16” | 3/4” plywood | 2 |
| 3 | DIVIDER | ¾” X 5.1/2” x 10,1.2” | 3/4” plywood | 1 |
| 4 | DRAWER SIDES | ¾” x 5.1/2” x 10.1/2” | 3/4” plywood | 2 |
| 5 | DRAWER BOTTOM | ¾”x 9.3/4” x 6.3/4” | 3/4” plywood | 1 |
| 6 | DRAWER BACK | ¾” x 5.1/2” x 6.3/4” | 3/4” plywood | 1 |
| 7 | CLEAT | 1.1/2”x5.1/2”x10.1/2” | 3/4” plywood | 2 |
CUTTING:
Draw a circle on the board using a soda can, then draw two lines: one from the bottom of the circle to 2 inches over the top of the board. Cut off the lines you created to create the tube slot using the jigsaw.
Cut off one of the sides along with the front and side parts of the drawer using the mitre saw now. To ensure that the front of the drawer matches the other dimensions, cut along the exterior of the drawer front.
SCREW DIVIDER:
To glue and screw the sides and front together, clamp them together. Attach the little rear piece and side top tube slot to the drawer base using glue or screws. The partition can now be secured in place using glue or screws. Put the divider flush against the parts using the clamps, and then fasten the drawer guide into the box.
Make sure the top is flush before flipping the assembly over to secure it to the box. Keep your position by using the screws. The drawer must first be clamped together before being assembled with glue and screws. While attaching the remainder of the drawer front, you can put a piece of wood under the drawer as a spacer.
CLEAT:
The advantage of this bike rack is that it only needs one stud to be secured. Make a pencil or tape mark where the stud is. Now use a 3 inch screw to secure the top screw in the cleat. Before you insert the second screw, make sure the board is level. Drill four 2 inch screws, two for the top and two for the bottom, while holding the rack up against the wall.
The finished product should resemble a box with a side drawer and an aperture for the top tube of the bicycle.
FINAL STEP:
After everything is constructed, you might wish to paint it to match the walls a little bit. For instance, you may place a plastic laminate over a white enamel base using contact cement.
If painting is more your style, prime the surface with acrylic first, then apply a water-based polyurethane for a glossy finish. No matter what your interests are, it’s a fun and reasonably inexpensive DIY project.
MISTAKES TO AVOID:
Following are some things you MUST NEVER do when storing your bike:
- Never keep a soiled bike in storage for an extended period of time. Any water or dirt left on your bike’s frame could harm the finish, corrode, or cause other problems like bolts to seize.
- Never leave your bicycle out overnight. Your bike may rust or develop other damage from the environment, and it may even be stolen with ease!
- Never put your bike in a position where the gearbox could be damaged, such as leaning against something or lying on the ground with the gears down. You run the danger of fracturing or bending this pricey and crucial component.
- If your bike has hydraulic disc brakes, you should never store it upside down. Air can enter the calipers more easily when the bike is upside down, resulting in spongy or nonexistent braking.
I’m eager to continue developing products for this area. Friends, in the meantime you can also search via google or youtube, there is a plenty of creative DIY ideas for bike mount rack. Cheers
Bike Mount Rack FAQs:
Is it OK to hang a bike by the wheel?
A bike can easily be hung up by its wheel. The wheel is made to support weights that are much heavier than the weight of the bicycle. The tyre holding the bike upright will be the only potential issue if it goes flat.
Is it OK to store bike upside down?
It states in the user guide for its hydraulic disc brakes: “The disc brake is not intended to operate when the bicycle is upright. The brake might not function properly if the bicycle is turned on its side or upside down, which could result in a serious accident.
What can I use as a bike stand?
Anything that allows the wheels and pedals to swivel can make a decent repair stand, including a storage stand. A car rack also functions admirably.
Are vertical bike racks bad for bikes?
Even very heavy bikes can be hung without any issues. You don’t need to worry about damaging the bike or your walls, however I would advise using two hooks to be careful. Is it acceptable to hang bikes backwards? Unless it has a hydraulic braking system, hanging your bicycle upside down is harmless.
How far apart should bike hooks be?
Put 36 cm (14 inches) between hooks. Once the hooks are set up, all that’s left to do is fasten the hook board to the wall at the desired height.


Contact Us
If you have any suggestions or advise, please feel free to reach us via our Contact Us here.
Various Types Of Bike Computers
Data’s significance is influencing every part of our lives as we speak because we live in a technologically advanced society. Cycling is following this pattern as well. Therefore, it’s becoming more and more crucial for cyclists to collect ride data. They use it to monitor their growth and performance and to get better at riding.
Bike computers are ideal for someone who wants to know more about the stats and route of their rides because they are made specifically for cycling. The safety issue of not tampering with your watch is significant, plus they are more waterproof (and have better battery life) than trying to install a phone.
A quality bike computer can help you enjoy cycling more. Bicycle computers come in a few different varieties, each with unique capabilities. While others are really sophisticated and provide you with all the cycling-related data you could ever desire, some are minimalistic and only provide you with the most basic information.

MAJOR OPTIONS:
When choosing the best approach to obtain cycling feedback, you have a lot of options. And there are more possibilities now because of how quickly technology is developing. Instead of obsessing over every feature, this article provides an overview to assist in reducing your options.
For data and navigation during a bicycle ride, you have three choices:
- SMARTPHONE – An economical option to get basic input on a Smartphone is through a cycling app, but battery life can be an issue.
- GPS-ENABLED FITNESS TRACKER: Ideal for multisport users is a GPS-enabled fitness tracker or watch with cycling capabilities.
- HANDLE BAR BIKE COMPUTER: Bike computers that mount on your handlebars are excellent for serious road and trail riders because they have a big screen, a long battery life, and an interface that is tailored specifically for cyclists.
TYPES OF BIKE COMPUTERS:
The various types of bike computers have evolved alongside the various functions of bike computers. These varieties now vary in terms of connectivity, analogue vs. digital, GPS vs. no GPS, and other features.
We’ll examine some of the most well-liked bike computers and learn more about them.
Read our relevant guide:
ANALOG BIKE COMPUTER:
An Analog bike computer is known as Omata, special bike computer. Its mechanical hands display information about time, climb, speed, and distance travelled based on precise GPS data. Read on to see why it is enjoyable.
Just begin riding, and the hands will advance. Analog indicators differ from their digital counterparts in that they seem strangely organic. After riding with Omata for a while, it becomes very instinctive to “see” the angle of the hands rather than “reading” the numbers.
The dial has a lot of depth and is beautiful to look at in all kinds of lighting. Although it is lovely, it doesn’t demand attention. It rapidly became an intrinsic part of my bike, in a really natural way. I enjoy that.
You may easily download your ride data using the Omata app. The ride is saved as a FIT file, which is a common format for fitness and health apps. You can email your ride to GoldenCheetah for more analysis, integrate it into Cyclometer, or post it to Strava. Omata can be linked to external ANT+/Bluetooth sensors, such as a power meter or heart rate monitor, using the app.
The Omata One is a viable option if you’re searching for an alternative to today’s hyper-connected cycling computers.

WIRED BIKE COMPUTER:
With Wired Speed, a sensor may send data about a bicycle’s speed to a computer over a cable. “Sigma Sport combines inventive design with precision engineering to represent German technology at its best level.”
Most of these same capabilities are also available on wired computers. The main distinction is the requirement for wiring to be run around your bike. If you only have a front wheel speed sensor, this isn’t a big deal. However, if you add cadence or use a generator hub, the wiring lines get very crowded and challenging to keep “clean” on your lovely new bike.
If you have a limited budget, can run a wire down your bike, and don’t worry too much about aesthetics, wired bike computers are the ones to choose. They are an improved standardization of bicycle computers. They are more likely to have better features than wireless bike computers because they are more recent on the market.

WIRELESS BIKE COMPUTER:
This type of bike computer operates in an easy manner. A signal is produced each time a magnet on the wheel moves past a sensor on the fork. Based on the wheel size you gave it during initial setup, the bike computer calculates your speed based on the interval between those signals.
These bike computers are for you if you’re worried about your bike becoming tangled up in cables while you’re riding, care about it looking well, and have more money to spare. These two units are where wireless communications are sent. Even though they use battery more quickly, not using a cable to link the handlebars and sensor is safer and more cost-effective in the long run.

GPS – ENABLED BIKE COMPUTERS:
Based on extensive testing by our knowledgeable team of road and mountain bike testers, these types are the top GPS bike computers.
Without the use of cables or magnets, GPS cycling computers correctly calculate speed, distance, and time based on satellite tracking of your location. You can submit the route-recorded information, together with heart rate, cadence, and power statistics, to a ride-logging site to assess your performance for entertainment or training purposes.
You can track your rides on apps like Strava, assess your performance, and, in some situations, use GPS bike computers to navigate.
BRANDS IN BIKE COMPUTERS WORLD:
Similar brands to those that dominate the vehicle GPS market dominate the cycling GPS market. The leading company is Garmin, but other names including Wahoo, Polar, Bryton, Sigma, Lezyne, and CatEye also make GPS-enabled products.
GARMIN:
The American tech business Garmin, formerly known as “ProNav,” was established in 1989. The business specializes in wearable devices including smart watches and fitness trackers as well as GPS technologies.
But when it comes to bike computers, Garmin is known for its high-end, high-tech devices that support both ANT+ and GPS. The majority of professional cyclists favor their brand because the majority of their models are pricey and high-quality.
The two leading models that the majority of performance-oriented riders choose are the Garmin Edge 1030, the Edge 820 and Edge 520. But since these models cost several hundred dollars, they rank among the most expensive ones available. This is caused by the wealth of features, nevertheless, including the precise navigation, common training data, USB and Bluetooth connectivity, ANT+ compatibility, and many more.

WAHOO:
When it comes to bike computer businesses, Wahoo Fitness is the “new kid on the block.” Athletes like Chris Froome utilize their KICKR trainer for indoor training. It was founded in 2010 and is the official indoor trainer of Team Sky.
Wahoo ELEMNT devices provide a simple setup process that is quick and hassle-free, allowing you to focus on your ride, race, or training. Starting is easy, wireless, adjustable, and carried out via a simple smart phone user interface. You can simply customize your ELEMNT gadget to match your unique training objectives and get the most out of every session by using the free ELEMNT app.
The Wahoo Element and its replacement, the Element Bolt, are possibly their most popular models of bike computers. Both models include an integrated exercise and are aimed at the Smartphone generation, but at a whopping $300, the price will undoubtedly make you cringe.

CATEYE:
CatEye is a Japanese business that was established in 1954 and is focused on producing bike computers, reflectors, lights, and other riding accessories.
CatEye Smart Computers remove distraction from pointless data while utilizing the capabilities of your phone to give you GPS mapping and data recording so that you can share when the time is right.
It produces inexpensive, mid-range, and expensive kinds of cycling computers. It offers smart PCs that you can connect to your cellphones as well as connected and wireless computers. Its CatEye Velo, Enduro, and Strada models are among of the most well-liked ones.

CADENCE SENSORS:
To get the most out of their workouts, cyclists and bikers must use cadence sensors. Similar to a speedometer or pedometer, these gadgets enable cyclists to quantify energy output in rotations per minute (RPM).
Simply said, cadence is the rate at which you cycle. This is expressed in revolutions per minute, or rpm, by cyclists. Therefore, cycling at 60 rpm requires one foot to complete a full circle around once every second.
Fundamentally, cadence is quite straightforward: it’s the number of rotations your pedals do per minute when you’re riding. But it doesn’t take much time cycling to see that people pedal at varying speeds. Professional cyclists appear to pedal quickly when you watch them compete, especially on flat terrain.

Types of Bike Computers FAQs:
Is it worth getting a cycle computer?
Pros. Bicycle computers excel where other smart gadgets fail because they are weatherproof, crash-resistant, and engineered to fit on handlebars. For certain riders, recording GPS data is also crucial, and bike computers have plenty of battery life to accomplish just that. Also easy to use are today’s huge touchscreens.
How accurate are cycling computers?
It commits to transmitting the GPS signal into space with a 95% probability and a worldwide average user range error of less than or equal to 7.8 meters.
What should I look for in a bike computer?
Typical bicycle computers include Average speed, Maximum speed, an average rate, Elapsed time, Trip distance, Odometer, Clock, appropriate for wireless.
Which bike computer do the pros used?
Bike computers are used by the professional peloton to constantly monitor each rider’s performance throughout the Tour de France.
What is the bike computer called?
A device attached on a bicycle that calculates and displays trip information, similar to the instruments in a car’s dashboard, is known as a cyclocomputer, cycle computer, cycling computer, or cyclometer. For convenience, the head unit, a computer with a display, is typically fastened to the handlebar.
What is the point of bike computer?
During your cycling activity, a bicycle computer measures and shows data such as altitude, speed, distance travelled, and occasionally cadence or heart rate.
Does cyclist use GPS?
Several satellites are used by the so-called global positioning system (GPS) to pinpoint a sensor inside a gadget to within a few meters. Cycling enthusiasts can now use technology to precisely measure their distance travelled or remaining.
Can you use Garmin Connect as a bike computer?
Using a new program from Garmin, you can use your Apple iPhone or Android smartphone as a cycle computer. While riding a bike, Garmin Fit shows your route, speed, pace, distance travelled, elevation, time, and calories burned.
Which Bike computer has the best battery life?
Garmin Edge 830 Sensor Bundle is the best overall.
Think about the kind of battery your gadget will require before making a purchase.
The Bryton Rider 450E is a top-notch rechargeable computer on this list with a battery life of up to 32 hours.


Contact Us
If you have any suggestions or advise, please feel free to reach us via our Contact Us here.
How to install BMX Bike Pegs
How To Remove BMX Stunt Pegs
On BMX bikes with reinforced forks and frames, pegs are generally employed to execute tricks or feats. BMX bike pegs may be a fun addition to your BMX bike to some, but it may hinder your riding for others. Bulky bike pegs might be inconvenient when you’re trying to find a way to increase the pace of your racing BMX or make free styling acrobatics easier. Pegs can injure BMX bikes and people if they are attached to anything else. The two most popular types of pegs are threaded and bolt on. Both are quickly and easily removable.
Table of Content
In this guide we have covered the following areas for removing BMX stunt pegs:

Tools To Remove BMX Bike Pegs:
- 17-mm socket
- Ratchet
- Extension
- 19-mm Socket
- Screwdriver
Steps To Remove BMX Bike Pegs:
Bolt On Pegs:
Bolt on pegs are fastened to the hub’s axle nut with a bolt from the inside.
- From the exterior, screw in a 17-mm deep socket with ratchet and extension. Over the axle nut, the socket fits. Turn the socket until the nut feels snugly in place. Make the transition to a 19-mm socket if it won’t fit.
- The axle nut can be unfastened and removed by rotating the socket and ratchet in the opposite direction.
- Peg the axle off by sliding it. With the ratchet and socket, tighten the nut in its place.
Threaded Pegs:
Since these pegs are threaded, you may need to use a slightly different technique to remove them if they were screwed onto your bicycle.
- Through the two holes that have been drilled on the peg’s end, insert a screwdriver. The screwdriver should be parallel to the length and entirely through the peg.
- Utilizing the screwdriver as leverage, turn the peg in the opposite direction. The peg might need to be loosened with some power.
- In order to remove the peg, take out the screwdriver and complete the unwinding with your fingers.
In The End:
BMX bikes frequently include front or rear pegs that are unnecessary or undesirable. The good news is that you can simply undo the screw to remove the bolts holding the pegs in place without having to visit a bike shop.
BMX Bike Pegs FAQs:
How do you get a stuck peg off a bike?
Through the two holes that have been drilled on the peg’s end, insert a screwdriver. The screwdriver should be parallel to the length and entirely through the peg.
Utilizing the screwdriver as leverage, turn the peg in the opposite direction.
With your fingers, complete unscrewing the peg after removing the screwdriver from the situation.
Are BMX pegs universal?
Pegs can be found in the 10mm (3/8″) and 14mm diameters that correspond to BMX axles. To avoid producing two distinct sizes, the majority of pegs are now supplied with 10mm adapters and are 14mm in diameter. Last but not least, Pegs are often sold singly. So if you order one, you’ll actually get one like that.
Can you put pegs on any bike?
Any freestyle BMX bike will likely support pegs, it can be assumed. There’s a potential that a BMX race bike you buy won’t support pegs because racing BMX places a greater emphasis on lightness than freestyle BMX. No, putting on pegs requires a specific kind of axle.
What do peg wedges do?
You can add pegs to practically any bike with the Mafiabikes Peg Wedge Kit to give it a more stunt-like wheelie. Our ground-breaking new product, the Mafiabikes “Peg Wedge,” enables you to place pegs on virtually any bike, even ones with gears. Durable, lightweight, and simple to install Your stunt wheelie ride will vary with Peg Wedge!
Do all stunt pegs fit all BMX bikes?
Axle size: The vast majority of pegs are made to fit the 14mm axle standard, which is more robust than the 3/8 inch axle of a race bike and better able to withstand the forces involved in stunt riding. This axle standard is used on most street and park bikes.
Which way do bike pedals unscrew?
To remove the pedals from the crank arms, use a pedal wrench or hex key. Left pedals loosen by turning them clockwise, while the right pedals do the opposite. The replacement pedals should be greased up before being screwed in at a precise 90-degree angle. Left pedals tighten by rotating counterclockwise, while the right pedals do the opposite.
Can you put pegs on a quick release bike?
Pegs typically attach to the bike’s axles. However, the majority of MTBs have quick-release skewers, which are too short and cannot be tightened when a peg is mounted, making their construction and function incompatible with pegs.
How do you make a violin peg stay?
Slide the peg out of the pegbox after carefully removing a string (remember, only remove one string at a time), and bring it up to the light. Two glossy rings that completely encircle the peg should be seen as you turn the peg; this is where the pegs rub against the pegbox.
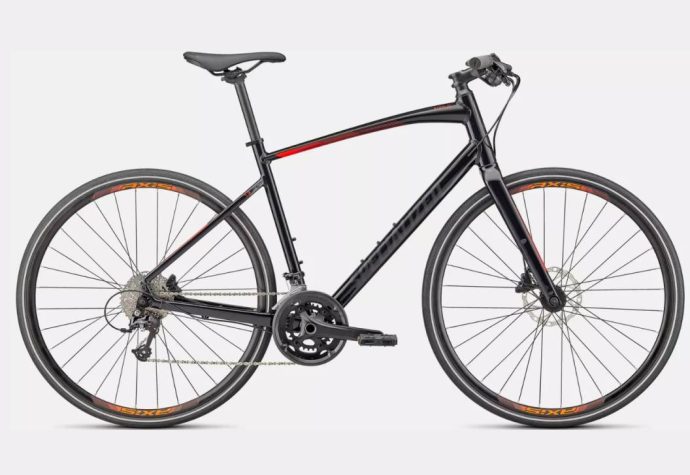

Contact Us
If you have any suggestions or advise, please feel free to reach us via our Contact Us here.
How to install BMX Bike Pegs
BMX bike pegs, the variety of acrobatics that BMX bike riders may pull off is increased by pegs. If you enjoy performing tricks or grinds, BMX bike pegs are a fantastic addition to your BMX bike, but not all models come with a set. In simplest terms, bike pegs are the tiny cylinders that protrude from either side of the wheel axle. Pegs enable riders to balance themselves over the wheel whether they are used on the front, back, or both. They have a more stable foundation for improved bike control while performing certain moves when they put their feet on the pegs
Table of Content
In this guide we have covered the following areas for BMX bike pegs:
- Best BMX Bike Pegs
- Pegs Build
- BMX Bike Pegs (Side Selection)
- Tools you need
- Steps to put pegs on BMX bike
- Result
- Pegs on BMX Bike FAQs

Best BMX bike pegs:
Pegs give BMX riders access to a variety of tools, particularly when performing tricks like grinds. Even though some BMX bikes already have pegs, you frequently must purchase them as separate extras. If so, keep in mind the following as you consider your options:
|
Pegs |
Material |
Weight |
Length |
Diameter |
|
Odyssey MPEGS |
Chromoly |
8.75 oz / 248 gm |
4” / 100 mm |
1.3” / 33 mm |
|
Odyssey Graduate |
Chromoly Core w/plastic sleeve |
7.4 oz / 210 gm |
4.5” / 114 mm |
1.5” / 38 mm |
|
25 Nine |
Aluminum Core w/plastic sleeve |
4.8 oz / 136 gm |
4.33” / 110 mm |
1.5” / 38 mm |
|
25 Nine |
Aluminum |
4.4 oz / 124 gm |
4.33” / 110 mm |
1.5” / 38 mm |
|
Novatec |
Steel |
8 oz / 227 gm |
4.33” / 110 mm |
1.5” / 38 mm |
|
Amotor |
Aluminum |
2 oz / 58 gm |
4” / 100 mm |
1.1” / 28 mm |
Pegs Build
Typically, pegs are constructed of an aluminum alloy or chromoly steel. Aluminum is lighter but more expensive than steel, which is a robust material. Although the pegs themselves are made of metal, rubber can be used for the surfaces to improve traction. Riders seeking longer or smoother grinds can also choose from replaceable nylon or plastic sleeves.
Typically, pegs are constructed to match the 14mm-wide axles found on most freestyle bikes. For the larger 3/8in axles on those models, adapters are available if your child wants to test them out on a race BMX.
BMX bike pegs (side selection)
Beginners should install pegs on their bikes when they are entirely at ease, making sure they don’t need them to look down at their feet as they move to and from the peg. I’d suggest installing four pegs on your bike and practicing grinds and street acrobatics to get accustomed to them.
The BMX rider’s preference typically dictates which side the BMX bike pegs go on; comfort and control are crucial factors in determining which side the BMX bike pegs go. BMX bike pegs are often mounted on the side opposite the rider’s forward-facing foot. When coasting, the rider’s right foot should be mostly pointed forward; hence pegs should be installed on that side.
Tools you need:
- Ratchet and Extension pole
- 17 or 19mm socket wrench
- Screw drivers
- Optional work stand
Steps to put pegs on BMX bike:
- Bolt removal: Use your bike stand or work stand if you have one; if not, simply turn your bike upside down. You can start by taking off the front nut or bolt from the hub. To prevent stripping its threads, you must apply a small amount of lubricant.
- Peg on axle: Put the nut inside your socket and then attach the peg to the axle. Finding it on the axle and tightening it down will be simpler as a result. If your peg has bolts, you must insert the bolts into the socket with the peg on top.
- Tighten Pegs: Now you just need to tighten the socket after guiding it into the hub. If you’re working on the bike’s rear, don’t loosen both nuts and bolts at once to prevent shifting the chain tension and, if it has a quick release, the rear wheel or tyre.
Result:
Use rear axles if you wish to attach pegs to the back wheel, and front axles if you want to attach pegs to the front wheel. Bicycle pegs can be produced of a variety of materials and weights in addition to the typical axle size, including aluminum alloy.
BMX bike pegs can be utilized to their full potential by riders who enjoy riding on the street and rail.
Pegs on BMX Bike FAQs:
Garmin FAQs:
Can you add pegs to any BMX bike?
Any freestyle BMX bike will likely support pegs, it can be assumed. There’s a potential that a BMX race bike you buy won’t support pegs because racing BMX places a greater emphasis on lightness than freestyle BMX. No, putting on pegs requires a specific kind of axle.
Are BMX bike pegs universal?
Pegs can be found in the 10mm (3/8″) and 14mm diameters that correspond to BMX axles. To avoid producing two distinct sizes, most pegs are now supplied with 10mm adapters and are 14mm in diameter. Finally, Pegs are often sold singly. So, if you order one, you’ll get one like that.
Can person ride on bike pegs?
A passenger on a bicycle is riskier to ride than on bike pegs. The cyclist may safely steer the bike in any direction because they have a great vision of everything in front of them. Additionally, the risk of injury to the passenger is not very significant when the driver must suddenly stop.
What ride should i put my BMX pegs on?
It’s what makes you feel more at ease. In your instance, often people would put it on the left, but I would try the pegs on both sides to see which side you prefer. However, typically people put it opposite of their drive side.
Do BMX bike pegs fit all types of BMX?
Pegs are not permitted on all BMX bike models. Due to the tight curves and shoulder-to-shoulder nature of racing circuits and racing action, pegs would be too dangerous in the event of crashes for BMX bike racers to use on their bikes.
Are all BMX pegs the same?
There are primarily two sorts of pegs, the first of which is plastic. Nylon sleeves on Plastic Pegs allow them to move easily across a variety of surfaces. These pegs still have metal inner cores; some manufacturers choose chrome, while others choose lighter aluminium.
Are BMX pegs universal?
The majority of bike pegs have a standard axle size that fits the 14 mm axle found on the majority of street and park bikes. Additionally, there are bike pegs made to meet the 3/8 inch axle standard used by racing bikes.
Why do BMX bikes have pegs?
Pegs enable riders to balance themselves over the wheel whether they are used on the front, back, or both. They have a more stable foundation for improved bike control while performing certain moves when they put their feet on the pegs.
Can u put pegs on a mountain bike?
As long as a mountain bike has a bolt-on axle that is long enough, pegs can be installed. Unfortunately, since mountain bikes are not designed for pegs, adding pegs could harm the bike’s fork and frame.
Can you add pegs to a beach cruiser?
The installation of pegs on a cruiser bike is possible as long as the hubs have solid axles or female BMX axles. If the cruiser bike has conventional hollow axles, the quick-release lever makes it difficult to instal pegs, making them unsafe to use.


Contact Us
If you have any suggestions or advise, please feel free to reach us via our Contact Us here.